基于LeNet的手写数字识别

基于LeNet的手写数字识别

作者:周洪锋 学号:20009200766

[TOC]

0、环境配置

需要用到的Python包有matplotlibpytorchtorchvision,其中pytorch可以使用GPU版本的,但需要按照好CUDA。

1、数据集下载

使用torchvision封装的数据集类来下载MNIST数据集,保存在工作文件夹下。

1
2
3
4
5
6
7
8
down_path = ".\data"
device = torch.device("cuda")

def raw_read():
trans = torchvision.transforms.Compose([torchvision.transforms.ToTensor(),
torchvision.transforms.Normalize(mean = [0.5],std = [0.5])])
train_raw = torchvision.datasets.MNIST(down_path,True,transform=trans,download=True)
test_raw = torchvision.datasets.MNIST(down_path,False,transform=trans,download=True)

2、加载数据集

直接下载的数据集并无法直接使用,需要使用pytorch将其处理成DataLoader数据加载器,然后作为迭代器使用。经过多次测试,使用批量大小为1024,线程数为4,以提高数据读取速度。

1
2
3
4
def get_loader(train_raw,test_raw,batch_size=256):
train_loader = DataLoader(dataset=train_raw,batch_size=batch_size,shuffle=True,num_workers=4,pin_memory=True)
test_loader = DataLoader(dataset=test_raw,batch_size=batch_size,num_workers=4,pin_memory=True)
return train_loader,test_loader

3、构建网络

LeNet的示意图

网络的主要构成如下:

(1)卷积层

输入大小为1*28*28,卷积核大小为5,填充为2,输出通道为6,输出的大小为6*28*28。

(2)池化层

采用最大池化方法,将输入大小减半,输出为6*14*14。

(3)卷积层

输入大小为为6*14*14,卷积核大小为5,填充为0,输出通道为16,输出大小为16*10*10。

(4)池化层

与(2)相同,最大池化,对输入进行下采样。

(5)卷积层

输入大小为为6*5*5,卷积核大小为5,填充为0,输出通道为120,输出大小为120*1*1。这一层也可以看成是全连接层。

(5.5)展平层

将输入的图像展平为batch_size*120的张量。

(6)全连接层

输入大小为一个长度120的张量,输出是长度为10的张量,张量的每个分量越大表达这个图片是某个数字的可能性越大。

(7)Softmax层

将长度为10的张量处理为表示概率的,取值为(0,1)的张量,最终可以用于损失函数的计算

为了提高网络识别的准确性,在各个层之间加了ReLU层,作为非线性神经元。

1
2
3
4
5
6
7
8
9
10
11
12
13
14
15
16
net = nn.Sequential(
nn.Conv2d(kernel_size=5,padding=2,out_channels=6,in_channels=1),
nn.ReLU(),
nn.MaxPool2d(kernel_size=2),
nn.ReLU(),
nn.Conv2d(kernel_size=5,in_channels=6,out_channels=16),
nn.ReLU(),
nn.MaxPool2d(kernel_size=2),
nn.ReLU(),
nn.Conv2d(kernel_size=5,in_channels=16,out_channels=120),
nn.Flatten(),
nn.Linear(in_features=120,out_features=10),
nn.ReLU(),
nn.Softmax(dim=1)
)
net.to(device)

4、优化器和损失函数

优化器选择pytorch封装好的Adam优化器,并开启权重衰减,防止过拟合。、

损失函数采用分类问题中常见的交叉熵损失函数。

1
2
optimizer = torch.optim.Adam(net.parameters(),lr=0.01,weight_decay=0.001)
loss = torch.nn.CrossEntropyLoss()

5、训练

训练设定的迭代轮次为30,每轮训练后记录准确率和平均损失,并返回,以便将数据可视化,观察训练结果。

1
2
3
4
5
6
7
8
9
10
11
12
13
14
15
16
17
18
19
20
21
22
23
24
25
26
27
28
29
30
31
def train(net,optimizer,loss,train_loader):
# 下面三个变量分别用来记录正确数目,总数目,和总损失
correct = 0
tot = 0
epoch_loss = 0
# 设置为训练模式
net.train()
for X,y in train_loader:
X = X.to(device)
y = y.to(device)

net.zero_grad()
yhat = net(X)
# 将数据集的标签转化为独热编码
y = torch.nn.functional.one_hot(y).type(torch.float32)
l = loss(yhat,y)
# 反向传播
l.mean().backward()
optimizer.step()
# 计算得到正确的个数
cmp = yhat.argmax(dim=1)==y.argmax(dim=1)
correct += cmp.sum()
# 总损失和训练集容量也进行累加
epoch_loss += l
tot += y.shape[0]

# 返回前将数据zhuanhui
correct = correct.to(torch.device("cpu"))
epoch_loss = epoch_loss.to(torch.device("cpu")).detach()
# 返回精度和损失
return correct/tot,epoch_loss/tot

6、测试

每轮训练完成后进行测试,记录准确率和平均损失,并返回。使用测试集可以评估训练结果并进行调参。

1
2
3
4
5
6
7
8
9
10
11
12
13
14
15
16
17
18
19
20
21
22
23
24
def test(net,loss,test_loader):
correct = 0
tot = 0
epoch_loss = 0

net.eval()
with torch.no_grad():
for X,y in test_loader:
X = X.to(device)
y = y.to(device)

yhat = net(X)

y = torch.nn.functional.one_hot(y).type(torch.float32)
l = loss(yhat,y)

cmp = yhat.argmax(dim=1)==y.argmax(dim=1)
correct += cmp.sum()
epoch_loss += l
tot += y.shape[0]

correct = correct.to(torch.device("cpu"))
epoch_loss = epoch_loss.to(torch.device("cpu")).detach()
return correct/tot,epoch_loss/tot

7、结果评估

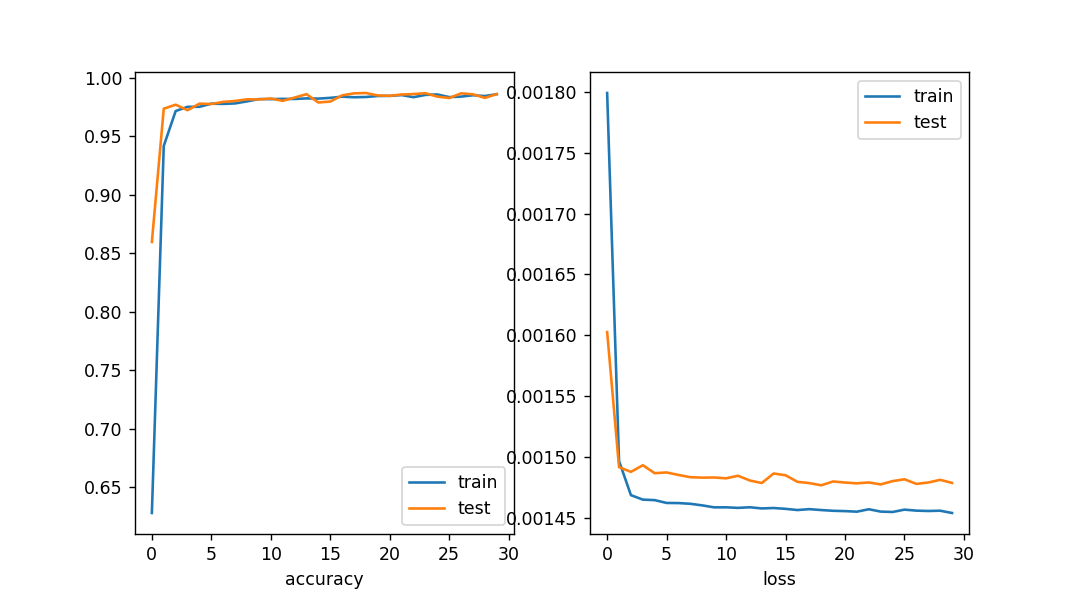
结果多次调参并评估结果,得到超参数按如下设定时,训练效果较好,在测试集上的准确率高于98%。

1
2
3
4
5
learn_rate = 0.01
weight_decay = 0.001
batch_size = 1024
num_workers = 4
num_epoches = 30

设计了以下函数,用于总体上控制训练和测试。并将结果可视化为图表。

1
2
3
4
5
6
7
8
9
10
11
12
13
14
15
16
17
18
19
20
21
22
23
24
25
26
27
28
29
30
31
def start(num_epoches,net,optimizer,loss,train_loader,test_loader):
# 四个列表用于容纳训练和测试的准确率和平均损失
train_acc = []
train_loss = []
test_acc = []
test_loss = []
# 训练轮次
for _ in range(num_epoches):
acc,epoch_loss = train(net,optimizer,loss,train_loader)
train_acc.append(acc)
train_loss.append(epoch_loss)

acc,epoch_loss = test(net,loss,test_loader)
test_acc.append(acc)
test_loss.append(epoch_loss)
# 绘图
pyplot.figure()
pyplot.subplot(1,2,1)
# 绘制准确率的图表
pyplot.plot(range(num_epoches),train_acc)
pyplot.plot(range(num_epoches),test_acc)
pyplot.xlabel("accuracy")
pyplot.legend(labels=("train","test"))
pyplot.subplot(1,2,2)
# 绘制平均损失的图表
pyplot.plot(range(num_epoches),train_loss)
pyplot.plot(range(num_epoches),test_loss)
pyplot.xlabel("loss")
pyplot.legend(labels=("train","test"))
pyplot.show()

结果如下:

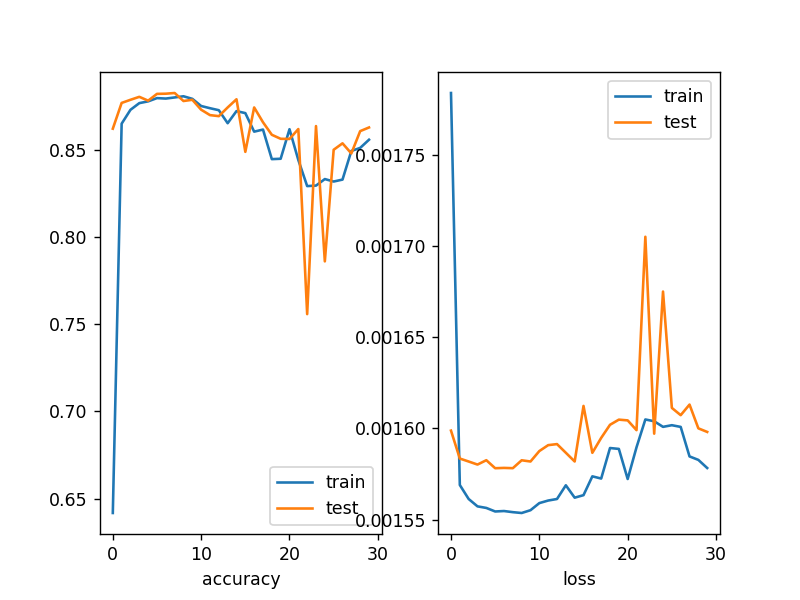
未加入权重衰减的结果:

未加入权重衰减的结果

加入权重衰减后

加入权重衰减的结果

可见,加入权重衰减后,精度和准确率的波动较小,减小了过拟合现象。

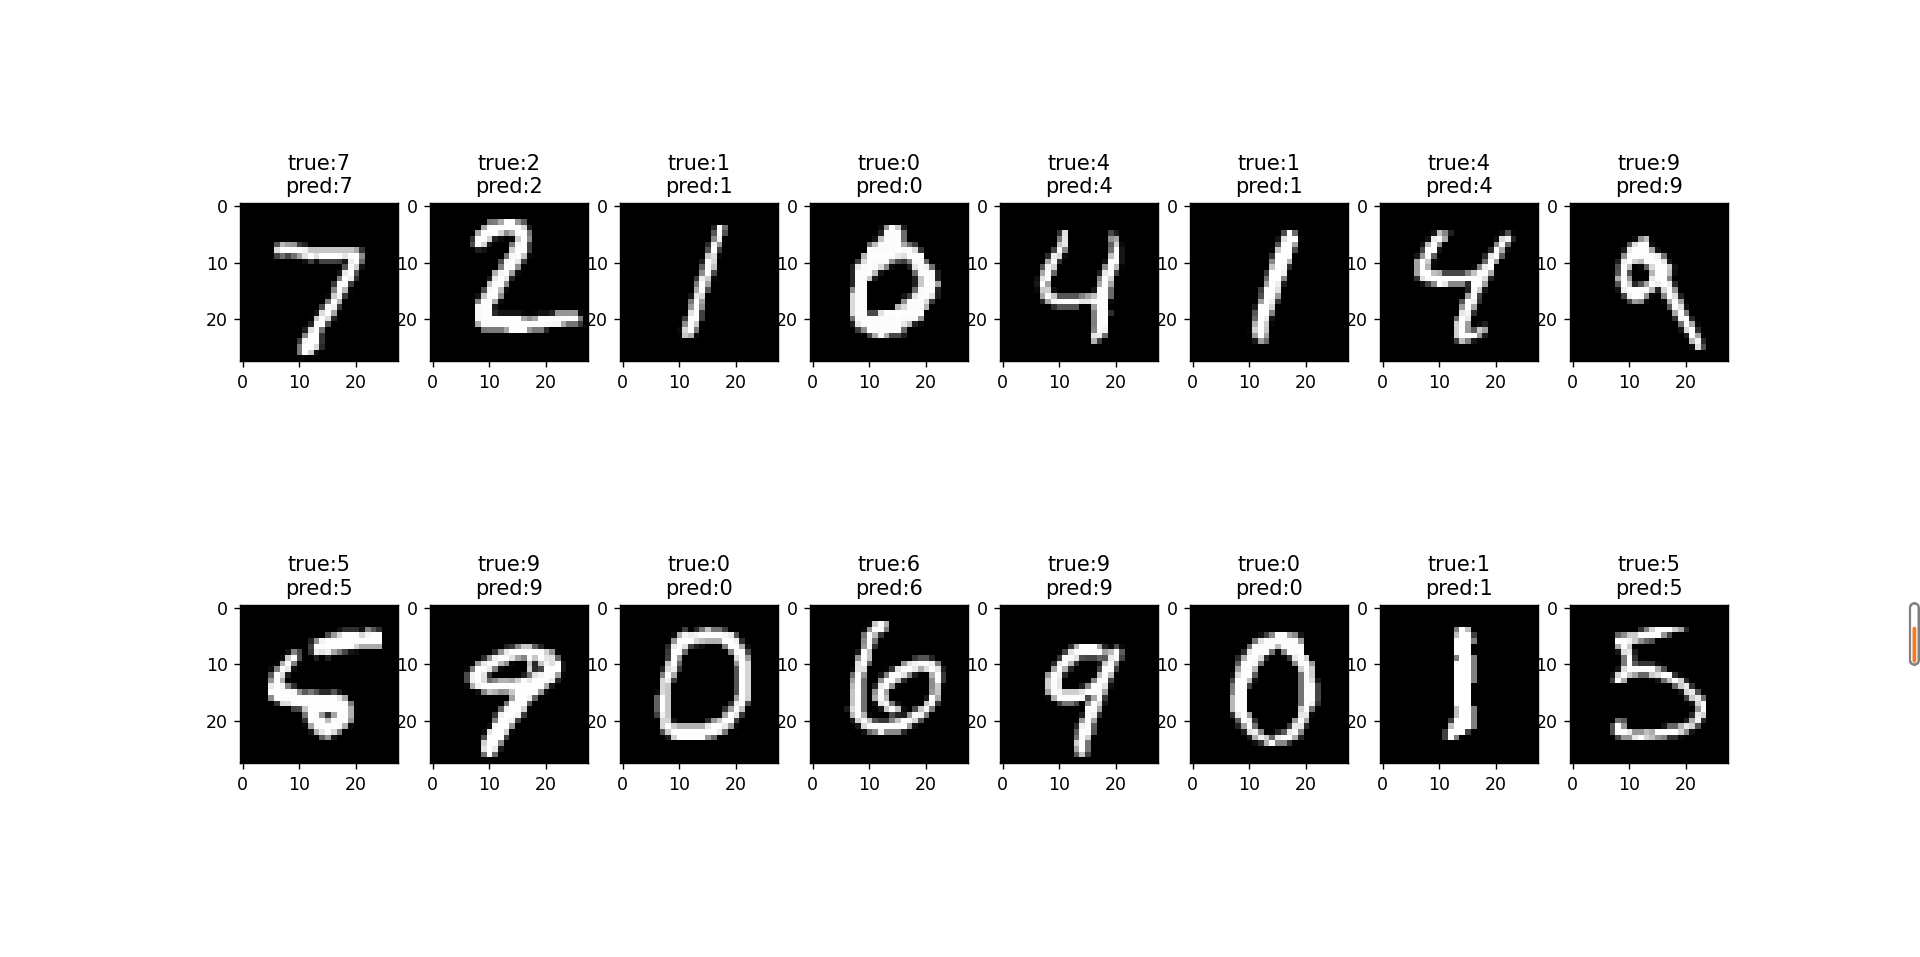
最后,将模型保存为文件格式,并编写另一个脚本show.py用于展示成果。

最终的结果

实验心得

经过这次实验,加深了对神经网络和计算机视觉领域的了解。虽然模型已经是使用前人设计的LeNet模型,但是实验中仍遇到许多问题,比如对框架的使用不够熟练、数据可视化结果较差、调参过程耗费大量时间等等。同时,为了提高训练速度,还需要同时关注内存、GPU、CPU、硬盘的情况,加深了对计算机体系和操作系统的理解。

完整代码:

1
2
3
4
5
6
7
8
9
10
11
12
13
14
15
16
17
18
19
20
21
22
23
24
25
26
27
28
29
30
31
32
33
34
35
36
37
38
39
40
41
42
43
44
45
46
47
48
49
50
51
52
53
54
55
56
57
58
59
60
61
62
63
64
65
66
67
68
69
70
71
72
73
74
75
76
77
78
79
80
81
82
83
84
85
86
87
88
89
90
91
92
93
94
95
96
97
98
99
100
101
102
103
104
105
106
107
108
109
110
111
112
113
114
115
116
117
118
119
120
121
122
123
124
125
126
127
128
129
130
131
132
133
134
135
136
137
138
139
140
141
import torch
import torchvision
from torch.utils.data import DataLoader
from torch import nn
from matplotlib import pyplot

down_path = ".\data"
device = torch.device("cuda")

def raw_read():
trans = torchvision.transforms.Compose([torchvision.transforms.ToTensor(),
torchvision.transforms.Normalize(mean = [0.5],std = [0.5])])
train_raw = torchvision.datasets.MNIST(down_path,True,transform=trans,download=True)
test_raw = torchvision.datasets.MNIST(down_path,False,transform=trans,download=True)
return train_raw,test_raw

def get_loader(train_raw,test_raw,batch_size=256):
train_loader = DataLoader(dataset=train_raw,batch_size=batch_size,shuffle=True,num_workers=4,pin_memory=True)
test_loader = DataLoader(dataset=test_raw,batch_size=batch_size,num_workers=4,pin_memory=True)
return train_loader,test_loader

def train(net,optimizer,loss,train_loader):
# 下面三个变量分别用来记录正确数目,总数目,和总损失
correct = 0
tot = 0
epoch_loss = 0
# 设置为训练模式
net.train()
for X,y in train_loader:
X = X.to(device)
y = y.to(device)

net.zero_grad()
yhat = net(X)
# 将数据集的标签转化为独热编码
y = torch.nn.functional.one_hot(y).type(torch.float32)
l = loss(yhat,y)
# 反向传播
l.mean().backward()
optimizer.step()
# 计算得到正确的个数
cmp = yhat.argmax(dim=1)==y.argmax(dim=1)
correct += cmp.sum()
# 总损失和训练集容量也进行累加
epoch_loss += l
tot += y.shape[0]

# 返回前将数据zhuanhui
correct = correct.to(torch.device("cpu"))
epoch_loss = epoch_loss.to(torch.device("cpu")).detach()
# 返回精度和损失
return correct/tot,epoch_loss/tot

def test(net,loss,test_loader):
correct = 0
tot = 0
epoch_loss = 0

net.eval()
with torch.no_grad():
for X,y in test_loader:
X = X.to(device)
y = y.to(device)

yhat = net(X)

y = torch.nn.functional.one_hot(y).type(torch.float32)
l = loss(yhat,y)

cmp = yhat.argmax(dim=1)==y.argmax(dim=1)
correct += cmp.sum()
epoch_loss += l
tot += y.shape[0]

correct = correct.to(torch.device("cpu"))
epoch_loss = epoch_loss.to(torch.device("cpu")).detach()
return correct/tot,epoch_loss/tot

def start(num_epoches,net,optimizer,loss,train_loader,test_loader):
# 四个列表用于容纳训练和测试的准确率和平均损失
train_acc = []
train_loss = []
test_acc = []
test_loss = []
# 训练轮次
for _ in range(num_epoches):
acc,epoch_loss = train(net,optimizer,loss,train_loader)
train_acc.append(acc)
train_loss.append(epoch_loss)

acc,epoch_loss = test(net,loss,test_loader)
test_acc.append(acc)
test_loss.append(epoch_loss)
# 绘图
pyplot.figure()
pyplot.subplot(1,2,1)
# 绘制准确率的图表
pyplot.plot(range(num_epoches),train_acc)
pyplot.plot(range(num_epoches),test_acc)
pyplot.xlabel("accuracy")
pyplot.legend(labels=("train","test"))
pyplot.subplot(1,2,2)
# 绘制平均损失的图表
pyplot.plot(range(num_epoches),train_loss)
pyplot.plot(range(num_epoches),test_loss)
pyplot.xlabel("loss")
pyplot.legend(labels=("train","test"))
pyplot.show()

if __name__ == '__main__':
batch_size = 1024
train_raw,test_raw = raw_read()

train_loader,test_loader = get_loader(train_raw,test_raw,batch_size)

net = nn.Sequential(
nn.Conv2d(kernel_size=5,padding=2,out_channels=6,in_channels=1),
nn.ReLU(),
nn.MaxPool2d(kernel_size=2),
nn.ReLU(),
nn.Conv2d(kernel_size=5,in_channels=6,out_channels=16),
nn.ReLU(),
nn.MaxPool2d(kernel_size=2),
nn.ReLU(),
nn.Conv2d(kernel_size=5,in_channels=16,out_channels=120),
nn.Flatten(),
nn.Linear(in_features=120,out_features=10),
nn.ReLU(),
nn.Softmax(dim=1)
)
net.to(device)

optimizer = torch.optim.Adam(net.parameters(),lr=0.01,weight_decay=0.001)
loss = torch.nn.CrossEntropyLoss()

start(30,net,optimizer,loss,train_loader,test_loader)

s = input("Save this model?")
if s == 'y':
torch.save(net,".\model.pth")


基于LeNet的手写数字识别
http://zhouhf.top/2022/11/03/基于LeNet的手写数字识别/
作者
周洪锋
发布于
2022年11月3日
许可协议