完成了CS144的Minnow Lab,这里写一篇博客来记录一下在各个Lab中的解决思路,还包括Minnow中设计到的现代Cpp语法,测评机框架等。
实现一个在内存中的读写流,下面是需要实现的接口:
1
2
3
4
5
6
7
8
9
10
11
12
13
14
15
16
class ByteStream { public :explicit ByteStream ( uint64_t capacity ) Reader& reader () ;const Reader& reader () const Writer& writer () ;const Writer& writer () const void set_error () true ; }; bool has_error () const return error_; }; protected :
实验文档写明只需要考虑单线程情况,所以并不需要实现互斥锁等等。需要注意的是,在实际代码中通常不会直接使用ByteSteam这个类,而是使用其派生类Reader和Writer,这两个类不会在基类的基础上添加新的数据成员,所以可以直接使用static_cast进行转换。具体的设计模式以及语法会在之后细说。
首先要考虑用什么数据结构来储存缓存在ByteSteam中的数据,考虑ByteSteam的特点是先进先出,所以很自然地想到使用队列来实现。但是这样会有一个问题,那就是Reader::peek()需要返回一个string_view,这要求缓存的内存必须是连续的,使用队列显然是很难做到的。另外又考虑vector模拟循环队列,但是在边界的数据还是非连续的,需要对其拼接。
本着不要重复造轮子的思想,直接采用string进行缓存,虽然效率可能比较低,但是省去很多内存管理的步骤,还可以直接返回string_view。
代码唯一需要注意的坑点就是在判断Reader::is_finished时,需要满足写方完成且缓存内容为空。
注意到Writer和Reader的声明为:
1
2
3
4
5
6
7
8
9
10
11
12
13
14
15
16
17
18
19
20
21
22
class Writer :public ByteStreampublic :void push ( std::string data ) void close () bool is_closed () const uint64_t available_capacity () const uint64_t bytes_pushed () const class Reader :public ByteStreampublic :std::string_view peek () const ; void pop ( uint64_t len ) bool is_finished () const uint64_t bytes_buffered () const uint64_t bytes_popped () const
再看一下ByteSteam::Writer()的实现:
1
2
3
4
5
6
Writer& ByteStream::writer () static_assert sizeof sizeof "Please add member variables to the ByteStream base, not the ByteStream Writer." );return static_cast <Writer&>( *this );
首先使用static_assert确定没有往Wrtier中添加新的数据成员,保证转换的成功,然后使用static_cast将实例指针转换为Writer。这样做的好处是在保证Reader和Writer共用一个缓存(这样才能通信)的同时,将它们的职责(权限)分开,防止读者写数据,写者读数据。
C++11 引入的编译时断言机制,用于在编译阶段验证条件是否满足。若条件为假,编译器会中断编译并显示指定的错误信息。语法为:
1 static_assert
其中条件表达式必须在编译时就可以求值。
除此之外,还有运行时断言assert,用于在运行时判定程序是否储存(仅在Debug模式下有用)。
静态转换,在编译时就完成,通常用于向上转换,向下转换时需要保证转换成功,否则会导致未定义行为,如访问非法内存等。
除此之外,还有更安全的动态类型转换dynamic_cast,主要用于运行时多态类型的向下转换,当转换失败时返回nullptr或抛出异常。
1
2
3
4
5
6
7
8
9
10
11
12
13
class ByteStream { public :protected :uint64_t capacity_;bool error_ {};bool is_closed_ = false ;unsigned int bytes_pushed_ = 0 ;unsigned int bytes_popped_ = 0 ;
在数据成员后面跟着的{}就是类内成员初始化 ,相当于在ByteSteam未提供构造函数列表初始化 的情况下,为数据成员提供一个默认值。
辨析一下使用圆括号()的初始化和使用花括号{}的初始化:圆括号是显式调用构造函数,而花括号(称为统一初始化 )有多种匹配方式,首先会尝试调用接受std::initializer_list的构造函数,例如vector的初始化,否则会调用参数匹配的构造函数。统一初始化还可以在函数进行返回时直接调用构造函数,并且支持返回值优化 。
由于网络是异步的,所以接收到的TCP包可能丢失、重复、乱序,所以这一章需要实现一个Reassembler,用于将接收到的有序的TCP包插入到ByteStream中。实验提供的公开接口有:
1
2
3
4
5
6
7
8
9
10
11
12
13
14
15
16
class Reassembler { public :explicit Reassembler ( ByteStream&& output ) : output_( std::move( output ) ),buffer_() {writer ().available_capacity ();void insert ( uint64_t first_index, std::string data, bool is_last_substring ) uint64_t count_bytes_pending () const Reader& reader () { return output_.reader (); }const Reader& reader () const return output_.reader (); }const Writer& writer () const return output_.writer (); }uint64_t first_in_window () const return first_in_window_; }uint64_t first_out_window () const return first_out_window_; }uint64_t end_index () const return end_index_; }void update_window_size ()
在将TCP包插入到ByteSteam之前,还需要有一个用于存放未按要求到达的TCP包,这里使用的是双端队列,但是重新思考一下,似乎使用multimap也可以实现,并且遍历和插入的效率会更高(省去插入排序的过程)?
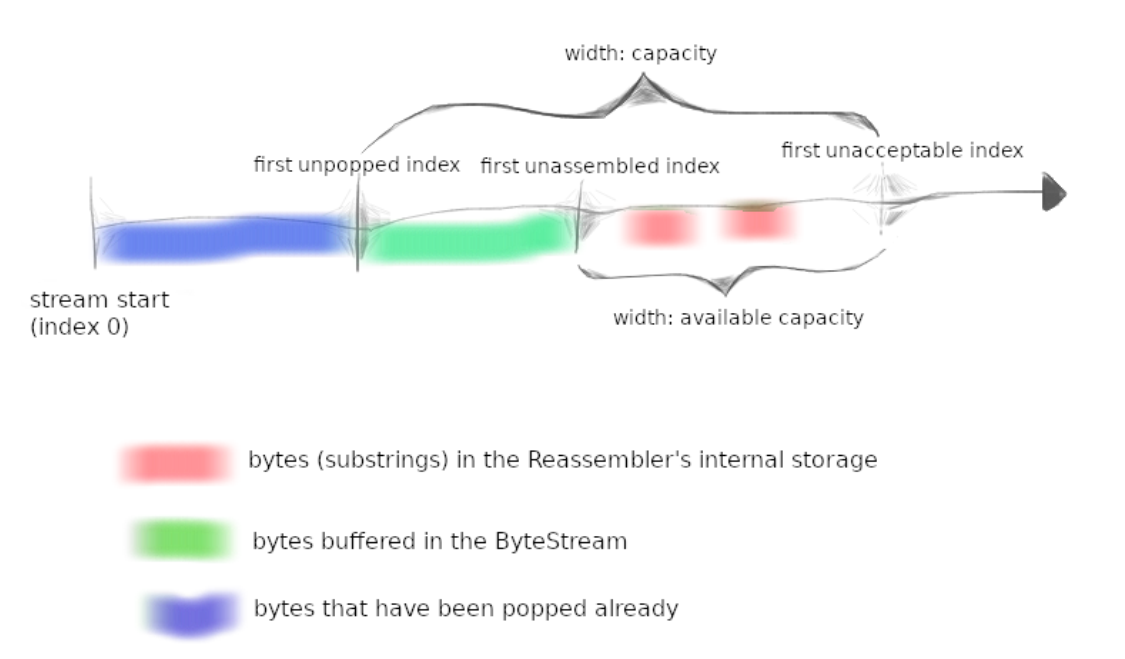
首先创建一个数据结构Segment,其中包含两个字段,一个是载荷数据,另一个是载荷数据首字节的seq。如下图所示,由于Reassembler也是有容量的限制的,所以需要增加几个额外的状态来维护这个容量的“窗口”。
first_in_window代表图中的“first unassembled index”,first_out_window代表图中的“first unacceptable index”,并且还需要一个end_index,默认为UINT64_MAX,当收到FIN字段时,更新之。
下面是insert方法的算法伪代码:
1
2
3
4
5
6
7
8
9
10
11
12
13
14
15
16
17
18
19
20
21
22
23
24
25
26
27
28
29
30
31
32
33
34
35
36
37
38
39
40
41
42
43
44
45
46
47
48
49
50
51
52
53
54
55
56
57
58
59
60
61
62
63
64
65
66
67
68
69
70
void Reassembler::insert ( uint64_t first_index, string data, bool is_last_substring ) if (is_last_substring) size ();min (first_in_window_ + output_.writer ().available_capacity (),end_index_); if (first_index<first_in_window_&&first_index+data.size ()>first_in_window_) uint64_t in_window = first_index+data.size () - first_in_window_;substr (first_in_window_-first_index,in_window);uint64_t out_of_window = first_index+data.size ()>first_out_window_?first_index+data.size ()-first_out_window_:0 ; substr (0 ,data.size () -out_of_window);if (first_index>=first_out_window_||first_index+data.size ()-1 <first_in_window_) if (is_last_substring) writer ().close ();return ;auto insert_it = buffer_.begin ();while ( insert_it != buffer_.end () && insert_it->first_index < first_index) while (insert_it!=buffer_.end ()) if (first_index+data.size ()>insert_it->first_index)if (first_index+data.size ()<insert_it->first_index+insert_it->data.size ())uint64_t overlapped_size = first_index+data.size () - insert_it->first_index;append (insert_it->data.substr (overlapped_size));erase (insert_it); else break ;insert (insert_it, {first_index,data}); if (insert_it != buffer_.begin ()) auto prev = std::prev (insert_it);if (prev->first_index+prev->data.size ()>=first_index)if (prev->first_index+prev->data.size ()<=first_index+data.size ())uint64_t overlapped_size = prev->first_index+prev->data.size () - first_index;append (data.substr (overlapped_size));erase (insert_it);for (auto it=buffer_.begin ();it!=buffer_.end ();) if (it->first_index==first_in_window_)writer ().push (it->data);size ();erase (it);if (first_in_window_==end_index_)writer ().close ();else break ;
Lab1实现的是一个逻辑上的Reassembler,但是真正的TCP考虑到字段的长度等因素,还不能够直接使用这个Reassembler,所以还需要进行一些包装。Lab2就实现了这样一个支持真正的TCP字段的TCP Receiver。
在此之前,还需要实现一个在int64和int32之间转化的包装器,算法不难,但是需要注意无符号整型之间计算绝对值的方式。TCPReceiver的实现逻辑也不难,就是几个特殊情况需要额外判断,然后调用Reassembler即可。
下面是TCPReceiverMessage的声明,其中包含了一个std::optional可选字段:
1
2
3
4
5
6
struct TCPReceiverMessage { uint16_t window_size {};bool RST {};
可选字段std::optional<>是一个模板类,常见操作有以下几种:
创建 :直接赋值或通过 std::make_optional。检查是否有值 :has_value() 或直接隐式转换为 bool。访问值 :value() 或运算符 * 和 ->(需确保值存在,否则未定义行为)。提供默认值 :value_or(default)。重置值 :reset() 或赋值为 std::nullopt
这个类很像C#、java语言中的空引用null,在语法上也支持直接作为布尔表达式使用,非常适合用来表达“值不存在”等特殊返回值的情况。
Lab3是要实现一个TCPSender,因为涉及到超时重传,所以需要引入时间这个状态(在这个实验中,时间是通过模拟出来的,即每次调用tick函数才会算作走过一定的时间)。
1
2
3
4
5
6
7
8
9
10
11
12
13
14
15
16
17
18
19
20
21
22
23
24
25
26
27
28
class TCPSender { public :TCPSender ( ByteStream&& input, Wrap32 isn, uint64_t initial_RTO_ms )input_ ( std::move ( input ) ),in_flight_ (), isn_ ( isn ), initial_RTO_ms_ ( initial_RTO_ms ),RTO_ms ( initial_RTO_ms )TCPSenderMessage make_empty_message () const ;void receive ( const TCPReceiverMessage& msg ) using TransmitFunction = std::function<void const TCPSenderMessage& )>;void push ( const TransmitFunction& transmit ) void tick ( uint64_t ms_since_last_tick, const TransmitFunction& transmit ) uint64_t sequence_numbers_in_flight () const uint64_t consecutive_retransmissions () const const Writer& writer () const return input_.writer (); }const Reader& reader () const return input_.reader (); }Writer& writer () { return input_.writer (); }
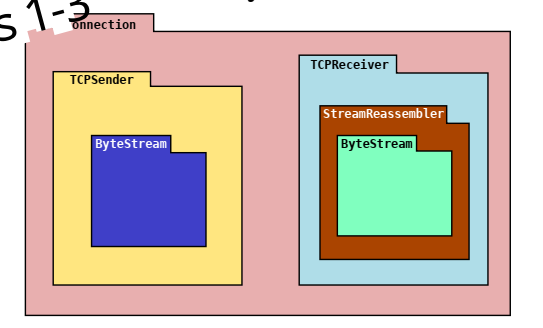
提供的接口有一个很奇怪的地方,那就是push方法居然没有提供数据来源,其实这里数据是从input这个ByteStream读的,发送数据时则发送通过提供的Transmit方法来写。具体的类之间的关系如下图:
首先是push方法,由于给的input中有多少数据是不知道的,所以需要实现try_push方法,在push中循环调用直到没有数据可以读。构建一个新的带数据的包时,最难处理的逻辑就是各种size了,因为SYN和FIN都是占一个序列号的,但是在处理载荷长度时,这两个东西又是不算进去的,所以需要格外细心的处理。
这里总结一下我的处理逻辑:
TCP包长度 = 当前窗口大小和TCP协议的最大载荷长度取最小值;
如果需要建立连接,载荷长度=TCP包长度-1,否则载荷长度=TCP包长度;
从input中取数据;
如果可以发送FIN,还需要看包长度是否小于窗口大小,再决定是否发送FIN。
发送出的包按照seq有序存放在双段队列中,等待定时器超时后发送。
接下来是定时器,这里的只需要有一个定时器即可,不需要像一些教材写的一样上为每一个发送的包都设置一个定时器,所以使用两个简单的uint64_t分别表示当前时间和超时时间即可。超时之后,把已发送队列中序列号最小的包重新发送即可。
Lab4是一个分析ping协议延迟、TTL的数据分析实验,这里直接跳过了。前面的Lab2、Lab3分别实现了TCP的发送和接受,Lab5则是顺着网络协议栈向下,实现数据链路层的ARP协议。
1
2
3
4
5
6
7
8
9
10
11
12
13
14
15
16
17
18
19
20
21
22
23
24
class NetworkInterface { public :class OutputPort { public :virtual void transmit ( const NetworkInterface& sender, const EthernetFrame& frame ) 0 ;virtual ~OutputPort () = default ;NetworkInterface ( std::string_view name,const EthernetAddress& ethernet_address,const Address& ip_address );void send_datagram ( const InternetDatagram& dgram, const Address& next_hop ) void recv_frame ( EthernetFrame frame ) void tick ( size_t ms_since_last_tick ) const std::string& name () const return name_; }const OutputPort& output () const return *port_; }OutputPort& output () { return *port_; }std::queue<InternetDatagram>& datagrams_received () { return datagrams_received_; }
以上是需要实现的公开接口。最核心的两个方法就是send_datagram以及recv_frame,分别是用于发送和接收的。
ARP协议需要额外的数据结构来维护状态,我的代码主要涉及三个映射表:
ARP协议需要维护一个逻辑地址与物理地址的映射表,这个映射表还需要存储映射的到期时间。考虑到实现的便捷性,可以直接使用map来实现。
另外,当发送一个新的IP包时,需要先查询mac地址,此时要将这个IP包暂存起来,查询到对应的mac地址后再发送。由于可能会向同一个IP发送多一个数据包,所以使用multimap来存储。
还有一个需求就是不要重复发送ARP包,所以另外使用一个map用于储存已经发送但是未回复的ARP包,当然也可以使用一些trick将这个map与第一个map合并。
1
2
3
std::map<Address, ArpStatus> arp_table_ {};uint64_t > pending_arp_ {};
1
2
3
4
5
6
7
8
9
10
11
12
13
14
15
16
17
18
19
20
21
22
23
24
25
void NetworkInterface::send_datagram ( const InternetDatagram& dgram, const Address& next_hop ) if (arp_table_.find (next_hop)==arp_table_.end ()) emplace ( next_hop, dgram);auto exist = pending_arp_.find (next_hop);if (exist!=pending_arp_.end ()) if (cur_time_ms>=exist->second) 5 *1000 ;quest_arp (next_hop);else quest_arp (next_hop);emplace (next_hop, cur_time_ms+5 *1000 );else make_and_send_frame ( arp_table_[next_hop].ethernet_address,serialize (dgram));
1
2
3
4
5
6
7
8
9
10
11
12
13
14
15
16
17
18
19
20
21
22
23
24
25
26
void NetworkInterface::recv_frame ( EthernetFrame frame ) if (frame.header.type==EthernetHeader::TYPE_IPv4if ( parse (datagram,frame.payload))push (datagram);else if (frame.header.type==EthernetHeader::TYPE_ARP) if (parse (arp_message,frame.payload))update_arp_table (Address::from_ipv4_numeric (arp_message.sender_ip_address),if (arp_message.opcode==ARPMessage::OPCODE_REQUESTthis ->ip_address_.ipv4_numeric ())reply_arp ( arp_message.sender_ip_address,else return ;
一个很需要注意的地方就是,当收到一个IP包时,只需要看当前包的mac地址是否与接口相符即可,无需对IP地址进行判断。这是因为,当前接口可能是位于路由器上的,可能自己不是该包的逻辑目的地,但是需要对其进行路由(这是下一个Lab的内容)。
Minnow框架中的时间是通过模拟产生的,并不是现实的时间。超时的处理逻辑很简单,只需要遍历两个与时间有关的map,将超时的包删除即可。
这一个Lab使用了三个 map 作为数据结构。鉴于我老是忘记 map 的时间和空间效率,所以这里回顾一下 map 的性能。map (红黑树实现)
插入 (insert、emplace):平均和最坏均为 O(log n)
删除 (erase):平均和最坏均为 O(log n)
查找 (find、count):平均和最坏均为 O(log n)
访问元素 (operator[]、at):平均和最坏均为 O(log n)
遍历 (迭代器递增):单次操作 O(1) ,整体遍历 O(n)
范围查询 (lower_bound、upper_bound):平均和最坏均为 O(log n)
unordered_map(哈希表实现)的时间复杂度
插入 (insert、emplace):平均 O(1) ,最坏 O(n)(哈希冲突严重时)
删除 (erase):平均 O(1) ,最坏 O(n)
查找 (find、count):平均 O(1) ,最坏 O(n)
访问元素 (operator[]、at):平均 O(1) ,最坏 O(n)
遍历 (迭代器递增):整体遍历 O(n)(可能因空桶导致实际时间略高,但总时间仍为线性)
并不是所有类都可以直接作为 map 和 unordered_map 的键,需要提前实现一些运算符或者哈希函数。
map 的键对于 map 类的键,需要实现小于比较逻辑,可以通过直接实现小于运算符 :
1
2
3
bool operator <(const MyKey& other) const {return std::tie (a, b) < std::tie (other.a, other.b);
也可以提供自定义比较器:
1
2
3
4
5
6
struct MyComparator {bool operator () (const MyKey& lhs, const MyKey& rhs) const return lhs.a > rhs.a;
unordered_map 的键:首先需要实现 == 运算符:
1
2
3
bool operator ==(const MyKey& other) const {return a == other.a && b == other.b;
还需要为这个键类提供一个哈希函数,可以在 std 命名空间中特化模板类:
1
2
3
4
5
6
7
8
9
10
11
namespace std {template <>struct hash <size_t operator () (const MyKey& k) const size_t h1 = hash<int >()(k.a);size_t h2 = hash<string>()(k.b);return h1 ^ (h2 << 1 );
还可以在声明 unordered_map 时显式指定哈希函数对象:
1
2
3
4
5
6
struct MyKeyHash {size_t operator () (const MyKey& k) const
这一个Lab主要是实现一个路由器的路由,需要实现的接口有以下两个:
1
2
3
4
5
6
7
8
9
10
11
12
13
14
class Router { public : push_back ( notnull ( "add_interface" , std::move ( interface ) ) ); return interfaces_.size () - 1 ; std::shared_ptr<NetworkInterface> interface ( const size_t N ) { return interfaces_.at ( N ); } void add_route ( uint32_t route_prefix, uint8_t prefix_length, std::optional<Address> next_hop, size_t interface_num ) void route ()
其中 add_route 用于向路由表中添加条目,route 方法将遍历当前路由器的所有接口,并根据其目的地的IP地址来转发到特定的接口。
首先回顾路由表的匹配规则,每个规则都有一个32位的IP地址和一个掩码,当对一个数据包进行路由时,会遍历路由表中的所有规则,并选取匹配的并且掩码最长的规则,进行端口转发。map,map 的键为规则的IP地址,值为下一跳地址和网络接口的索引。具体的声明如下:
1 std::vector<std::map<uint32_t , Rule>> rules_ {33 , std::map<uint32_t , Rule>()};
添加路由规则的逻辑很简单:
1
2
3
4
5
6
7
8
9
void Router::add_route ( const uint32_t route_prefix, const uint8_t prefix_length, const optional<Address> next_hop, const size_t interface_num ) if ( prefix_length > 32 ) "zhouhf: prefix_length is larger than 32" << "\n" ; emplace ( ip_with_mask (route_prefix,prefix_length),Rule{next_hop,interface_num});
对于 router 方法,如上文所说,需要先遍历每个接口:
1
2
3
4
5
6
7
void Router::route () for (auto &interface : interfaces_) route_interface (interface);
对于每个接口的每个接收到的IP包,分别进行判断:
1
2
3
4
5
6
7
8
9
10
11
12
13
14
15
16
17
18
19
20
21
22
23
24
25
26
27
28
29
30
void Router::route_interface ( std::shared_ptr<NetworkInterface> interface ) auto &queue = interface->datagrams_received (); while (!queue.empty ()) front (); pop (); if (datagram.header.ttl<=1 ) continue ; compute_checksum (); match_interface (datagram.header.dst); if (rule.next_hop.has_value ()) send_datagram (datagram, rule.next_hop.value ()); else send_datagram (datagram, Address::from_ipv4_numeric (datagram.header.dst)); Router::Rule Router::match_interface ( uint32_t ip ) const for (int prefix_length = 32 ; prefix_length >= 0 ; prefix_length--) auto exist = rules_[prefix_length].find ( ip_with_mask ( ip, prefix_length)); if (exist!=rules_[prefix_length].end ()) return exist->second; return {};
在这个Lab中,我发现了 Minnow 源代码中一个比较严重的bug,引发bug的代码如下:
1 vector<shared_ptr<NetworkSegment>> segments_ { 6 , make_shared<NetworkSegment>() };
这段代码在类中声明了一个大小为6的 vector,vector 装的类型为指向 NetworkSegment 的智能指针,但是这段代码并不是调用6次 make_shared<NetworkSegment>() 产生6个指向不同 NetworkSegment 的指针,而是调用一次该函数,然后复制6个同样的指针。NetworkSegment,实际上6个指针都是指向同一个对象,这导致测评机模拟的所有设备都在同一个网段中,虽然对测评机的正确性没什么影响,但是当学生的代码测试不通过时,会在屏幕上输出大量的错误信息,影响debug。
1
2
3
4
5
6
7
8
vector<shared_ptr<NetworkSegment>> segments_ {
已经提交PR并被作者接受。
shared_ptr 和 unique_ptr 一般采用 make_* 来创建,这样一是可以防止在实例化新对象时抛出异常,导致智能指针未实例化,最终导致内存泄漏,二是使用 new 会导致两次内存分配,而 make_* 会将对象和控制块合并到单词内存分配中。make_* 函数的参数即为想要实例化的方法的构造函数参数。
unique_ptr 需要使用 std::move 来完成所有权转移,而 shared_ptr 可以直接复制。访问所有权被转移的 unique_ptr 会导致未定义行为,但是可以重新赋值新资源或显式释放资源:
1
2
3
ptr1 = std::make_unique<int >(100 ); reset (); reset (new int 50 ));
智能指针可以像普通指针一样地使用,也可以调用 get() 方法获取裸指针。
当 unique_ptr 的生存期到达时,会自动调用析构函数释放资源。也可以通过手动调用 release 、reset 来释放:
1 2 3 4 int * raw_ptr = ptr4.release (); reset (); reset (new int 50 ));
shared_ptr 也类似:
1 2 sptr5.reset (); reset (new int 50 ));

